Reward Shaping in Multi-Agent Tag
How reward function design determines whether RL agents learn to play tag — or learn to hide in corners.
The Problem
Training two RL agents to play tag seems simple: the seeker gets a reward for catching, the hider gets a reward for surviving. But the details of reward shaping dramatically affect what behaviors emerge.
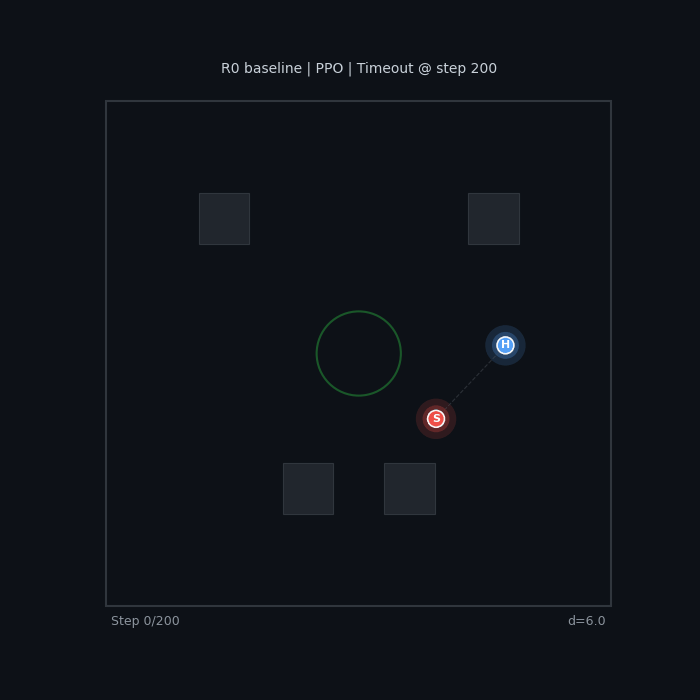
With minimal or sparse rewards, agents develop degenerate strategies:
| R0 Baseline (PPO) Passive pursuit, no urgency |
R4 Sparse (PPO) Wall camping, no real evasion |
 |
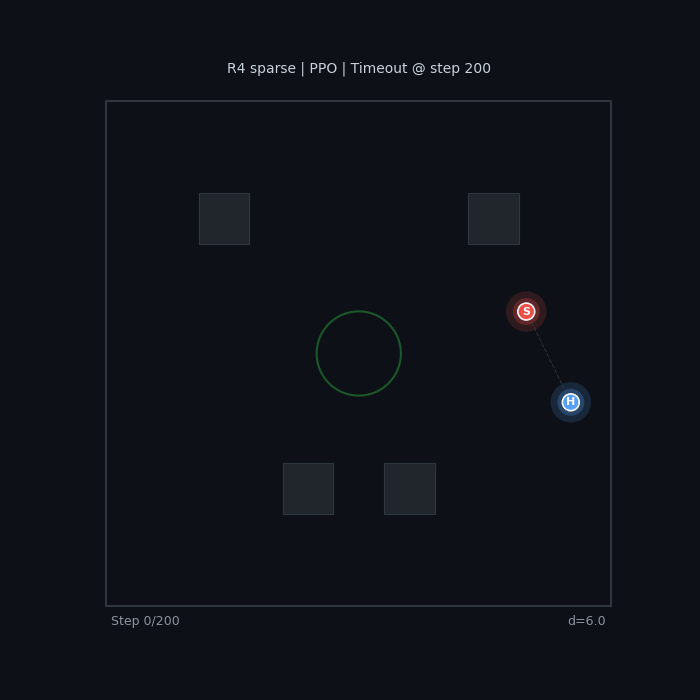 |
The baseline seeker wanders without urgency. The sparse-reward hider camps in a corner — technically optimal (maximizes distance), but not what we want.
Environment
Arena
The game takes place in a $30 \times 30$ bounded arena ($L = 15$, coordinates in $[-L, L]^2$) with 4 rectangular obstacles and a central safe zone. The hider has a 15% speed advantage over the seeker. Episodes last $T_{\max} = 200$ action steps (10 seconds of simulated time at $\Delta t = 1/60$ s, 3 physics substeps per action).
State Space
At each timestep $t$, each agent $i \in \lbrace S, H \rbrace$ (seeker, hider) observes a vector $o_i^t \in \mathbb{R}^{87}$:
\[o_i^t = \bigl[\, \underbrace{p_i / L}_{\text{position}},\; \underbrace{v_i / 10}_{\text{velocity}},\; \underbrace{(p_j - p_i)/L}_{\text{relative pos.}},\; \underbrace{(v_j - v_i)/10}_{\text{relative vel.}},\; \underbrace{\rho_i}_{\text{role flags}},\; \underbrace{(\cos\theta_i, \sin\theta_i)}_{\text{facing}},\; \underbrace{r_i \in \mathbb{R}^{72}}_{\text{vision rays}},\; \underbrace{z \in \mathbb{R}^3}_{\text{safe zone}} \,\bigr]\]where:
- $p_i \in \mathbb{R}^2$ is the agent’s position, $v_i \in \mathbb{R}^2$ its velocity
- $j$ denotes the opponent
- $\rho_S = (1, 0)$, $\rho_H = (0, 1)$ are one-hot role flags
- $\theta_i$ is the facing angle
- $r_i$ consists of 36 rays spanning a 120° FOV, each returning (normalized distance, hit type) where hit type encodes wall (0), obstacle (0.5), or agent (1)
- $z = (\text{in_zone}, \text{exhausted}, \text{cooldown_frac})$ is the safe zone state
Action Space
Each agent outputs a continuous action $a_i^t \in [-1, 1]^3$:
\[a_i^t = (a_x, a_y, a_{\text{sprint}})\]where $(a_x, a_y)$ specify a target velocity direction scaled by max speed, and $a_{\text{sprint}}$ controls sprint intensity (unused in this study). The environment applies acceleration-based physics: $v_i \leftarrow v_i + \alpha(a_i \cdot v_{\max} - v_i)\Delta t$ with $\alpha = 20$ and $v_{\max} = 8.0$ for the seeker, $v_{\max} = 9.2$ for the hider.
Tagging Condition
The seeker tags the hider when $\lVert p_S - p_H \rVert < d_{\text{tag}} = 1.5$, unless the hider is in the safe zone (radius 2.5, centered at origin) with remaining protection time.
Reward Functions
All presets share the same terminal rewards:
\[r_S^{\text{terminal}} = \begin{cases} +W & \text{if tagged} \\ -W & \text{if timeout} \end{cases} \qquad r_H^{\text{terminal}} = \begin{cases} -W & \text{if tagged} \\ +B & \text{if timeout} \end{cases}\]with win bonus $W = 10$ and timeout hider bonus $B = 6$. The presets differ in their per-step shaping rewards, which are summed to form the total per-step reward for each agent.
Shaping Components
We define the following notation:
| Symbol | Definition |
|---|---|
| $d_t = \lVert p_S^t - p_H^t \rVert$ | Inter-agent distance at step $t$ |
| $\Delta d_t = d_{t-1} - d_t$ | Distance progress (positive when seeker closes gap) |
| $w_H^t = L - \max(\lvert p_{H,x}^t \rvert, \lvert p_{H,y}^t \rvert)$ | Hider’s minimum distance to any wall |
| $s_H^t = \lVert v_H^t \rVert$ | Hider speed |
| $\mathcal{G}_i^t \subseteq \lbrace 1, \ldots, 6 \rbrace^2$ | Set of $6 \times 6$ grid cells visited by agent $i$ up to step $t$ |
| $t / T_{\max}$ | Normalized episode progress |
The per-step shaping reward for each agent is:
\[r_S^{\text{step}} = \underbrace{c_{\text{time}} \cdot f(t)}_{\text{time penalty}} + \underbrace{c_{\text{dist}} \cdot \Delta d_t}_{\text{pursuit shaping}} + \underbrace{c_{\text{cov}} \cdot \lvert \mathcal{G}_S^t \setminus \mathcal{G}_S^{t-1} \rvert}_{\text{coverage bonus}}\] \[r_H^{\text{step}} = \underbrace{c_{\text{surv}}}_{\text{survival bonus}} - \underbrace{c_{\Delta d} \cdot \Delta d_t}_{\text{evasion (distance change)}} + \underbrace{c_{|d|} \cdot \frac{d_t}{L}}_{\text{absolute distance}} + \underbrace{c_{\text{wall}} \cdot \max\!\Big(0,\; 1 - \frac{w_H^t}{d_w}\Big)}_{\text{wall proximity penalty}} + \underbrace{c_{\text{speed}} \cdot \mathbb{1}[s_H^t > 1]}_{\text{speed bonus}} + \underbrace{c_{\text{cov}} \cdot \lvert \mathcal{G}_H^t \setminus \mathcal{G}_H^{t-1} \rvert}_{\text{coverage bonus}}\]where the time penalty scaling function is:
\[f(t) = \begin{cases} 1 + t / T_{\max} & \text{if escalating urgency is enabled} \\ 1 & \text{otherwise} \end{cases}\]and $d_w = 2.0$ is the wall proximity threshold.
Preset Coefficients
Each preset selects a subset of these terms by setting specific coefficients:
| Preset | $c_{\text{time}}$ | $f(t)$ | $c_{\text{dist}}$ | $c_{\text{surv}}$ | $c_{\Delta d}$ | $c_{\lvert d \rvert}$ | $c_{\text{wall}}$ | $c_{\text{speed}}$ | $c_{\text{cov}}$ |
|---|---|---|---|---|---|---|---|---|---|
| R0 Baseline | $-0.005$ | $1$ | $0$ | $0.01$ | $0$ | $0$ | $0$ | $0$ | $0$ |
| R1 Pursuit | $-0.02$ | $1$ | $0.2$ | $0.01$ | $0$ | $0$ | $0$ | $0$ | $0$ |
| R2 Active | $-0.005$ | $1$ | $0.14$ | $0.01$ | $0.14$ | $0.1$ | $-0.02$ | $0.005$ | $0$ |
| R3 Both | $-0.02$ | $1$ | $0.2$ | $0.01$ | $0.14$ | $0.1$ | $-0.02$ | $0.005$ | $0$ |
| R4 Sparse | $0$ | $1$ | $0$ | $0$ | $0$ | $0$ | $0$ | $0$ | $0$ |
| R5 Escalating | $-0.01$ | $1 + t/T$ | $0.14$ | $0.01$ | $0$ | $0.1$ | $0$ | $0$ | $0$ |
| R6 Coverage | $-0.005$ | $1$ | $0.14$ | $0.01$ | $0$ | $0.05$ | $0$ | $0$ | $0.1$ |
| R7 Kitchen Sink | $-0.015$ | $1 + t/T$ | $0.2$ | $0.01$ | $0.14$ | $0.1$ | $-0.02$ | $0.005$ | $0.05$ |
Design rationale:
- R0 and R4 are controls: R0 has minimal shaping, R4 has none at all.
- R1 tests whether strong seeker signals alone suffice.
- R2 tests whether anti-degenerate hider shaping (wall penalty + speed bonus) prevents corner camping.
- R3 combines R1 and R2 to see if both-agent shaping compounds.
- R5 tests whether dynamic pressure (escalating time penalty) creates more interesting pursuit.
- R6 tests whether exploration incentives (grid coverage bonus) help agents discover the full arena.
- R7 combines everything, testing whether more terms always helps.
Algorithms
Each preset is trained with two algorithms:
PPO (Proximal Policy Optimization) — on-policy actor-critic with clipped surrogate objective. Both agents collect rollouts simultaneously from 64 parallel environments, with batch size 4096 and 10 optimization epochs per update.
SAC (Soft Actor-Critic) — off-policy actor-critic that maximizes reward plus an entropy bonus $\mathcal{H}[\pi]$, with automatic temperature tuning. Each agent maintains a separate replay buffer (500K transitions), twin Q-networks, and squashed Gaussian policy. The entropy term is:
\[J_\pi = \mathbb{E}\Big[\sum_t r_t + \alpha \mathcal{H}\big[\pi(\cdot \mid s_t)\big]\Big]\]where $\alpha$ is automatically tuned to maintain target entropy $-\dim(\mathcal{A}) = -3$. This implicit exploration bonus proves critical for hider performance.
Both algorithms use the same network architecture: 2-layer MLP (256 hidden units, ReLU activations). All runs use learning rate $3 \times 10^{-4}$, $\gamma = 0.99$, and train for 5M timesteps across 3 random seeds.
What Good Behavior Looks Like
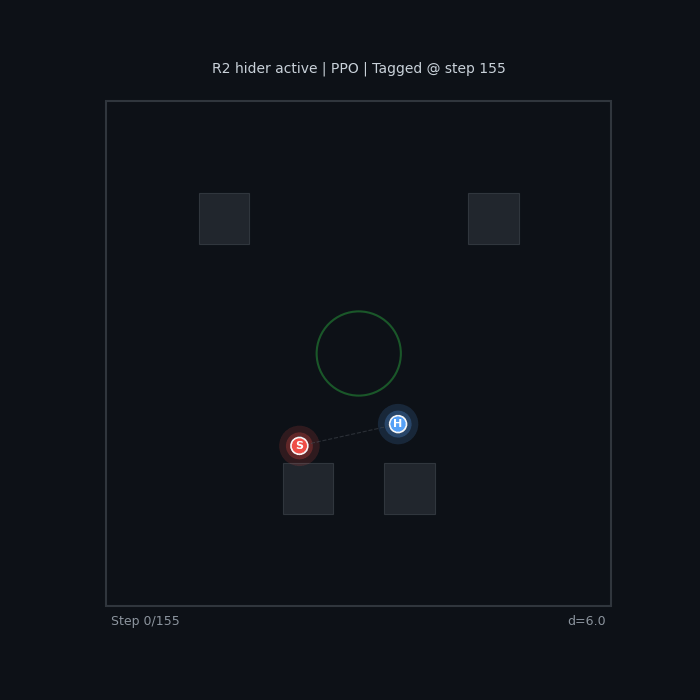
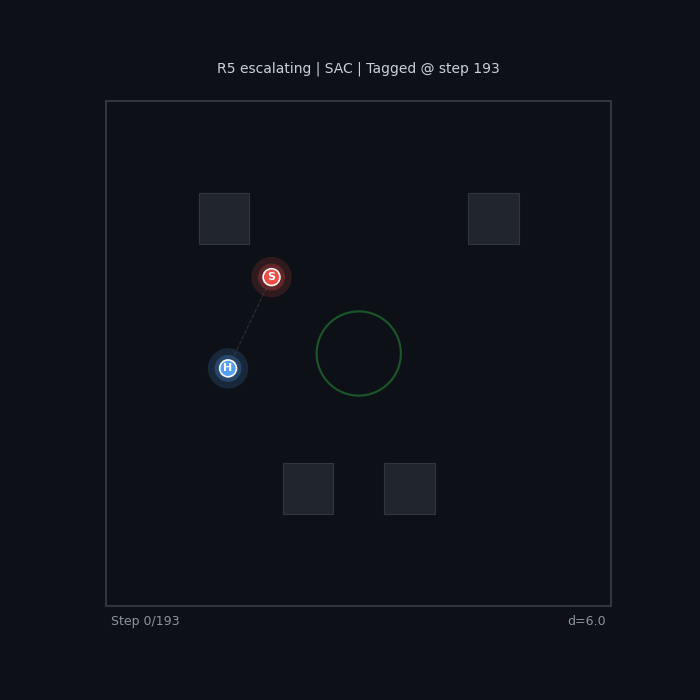
With the right reward shaping, agents learn genuine pursuit and evasion:
| R2 Active Hider (PPO) Wall penalty + speed bonus |
R5 Escalating (SAC) Increasing seeker urgency |
 |
 |
| R3 Both Shaped (SAC) Seeker pursuit + hider evasion |
R7 Kitchen Sink (PPO) All shaping terms combined |
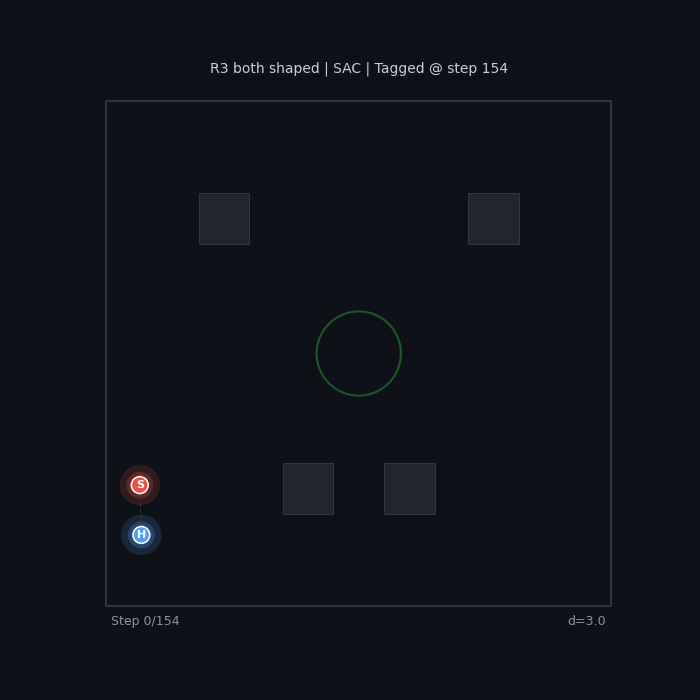 |
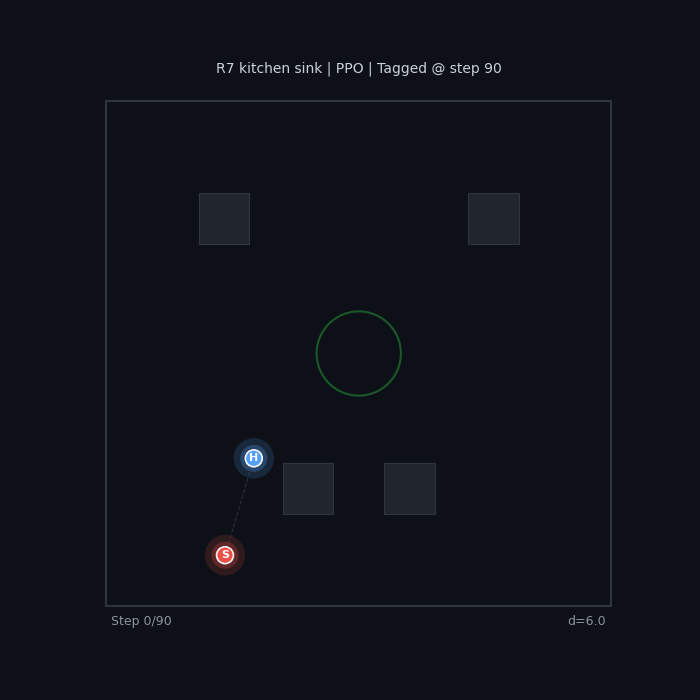 |
Cross-Config Gauntlet
To measure which reward functions produce genuinely capable agents (not just agents that look good against their training partner), I ran a full cross-evaluation: every seeker vs every hider across all 16 configurations, 20 episodes per matchup (256 matchups total).
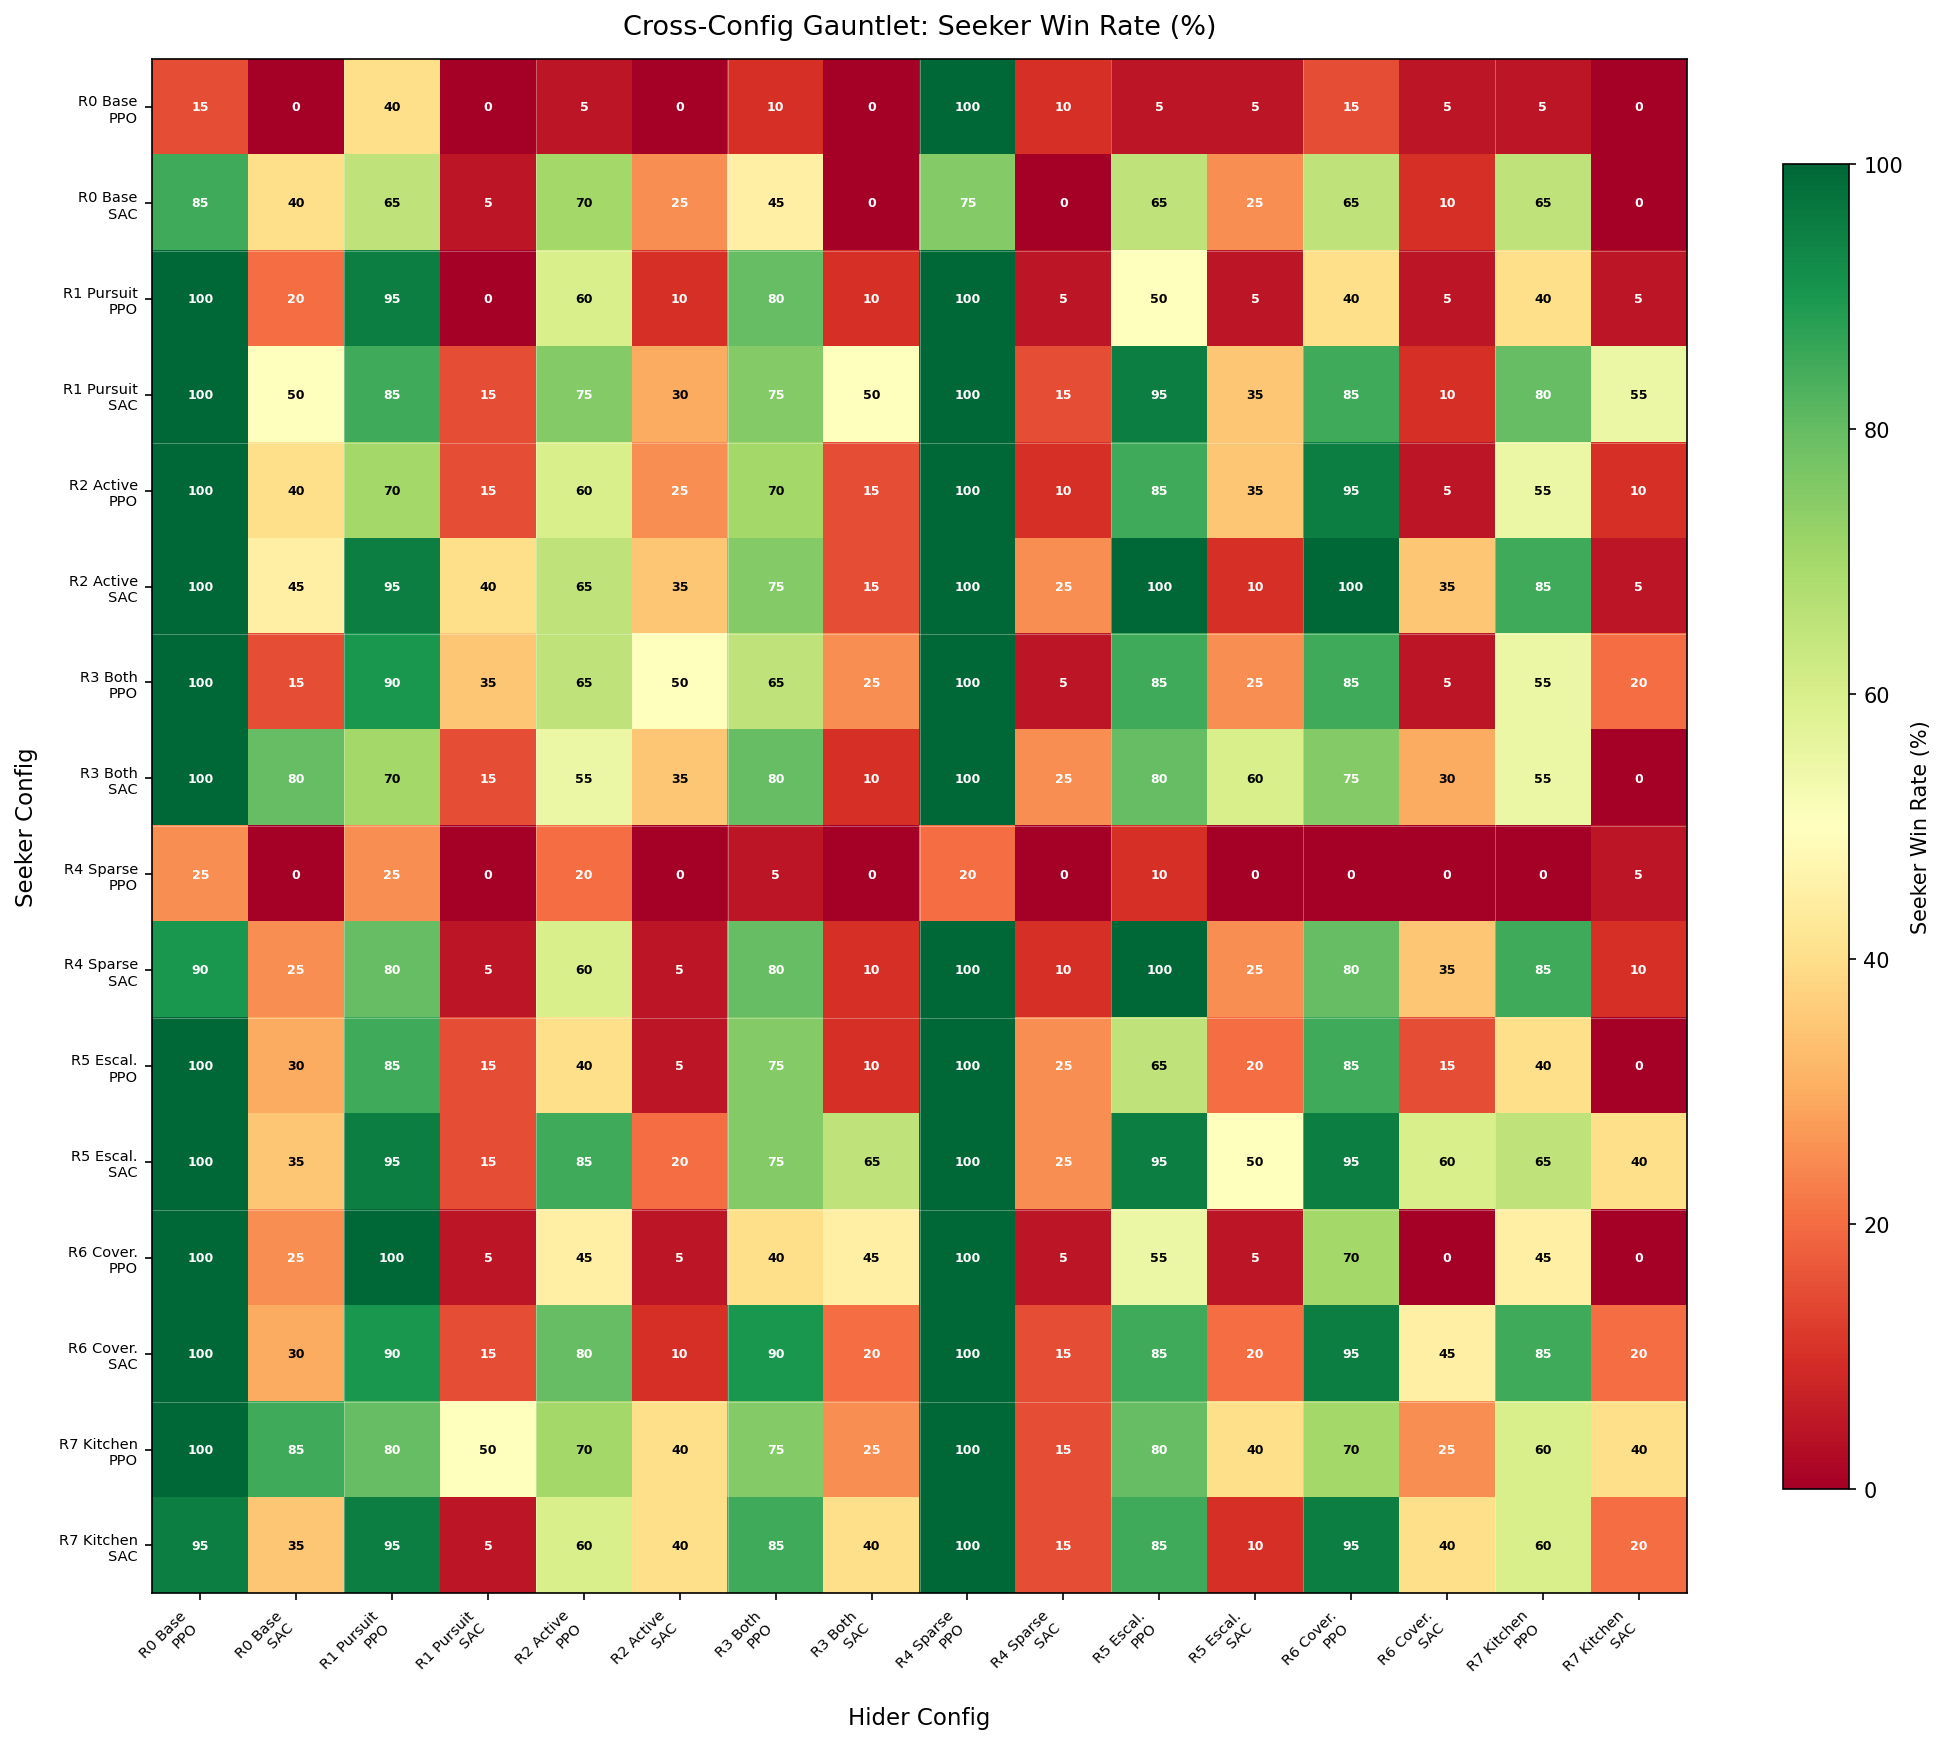
Each cell shows seeker win rate (%). Rows = seeker config, columns = hider config. Green = seeker wins, red = hider survives.
Key Patterns
The heatmap reveals a striking algorithm asymmetry: SAC hiders (odd columns) are dramatically harder to catch than PPO hiders (even columns), forming a clear vertical stripe pattern. Meanwhile, SAC and PPO seekers are more comparable.
Seeker and Hider Strength
Aggregating across all opponents gives each config’s overall strength:
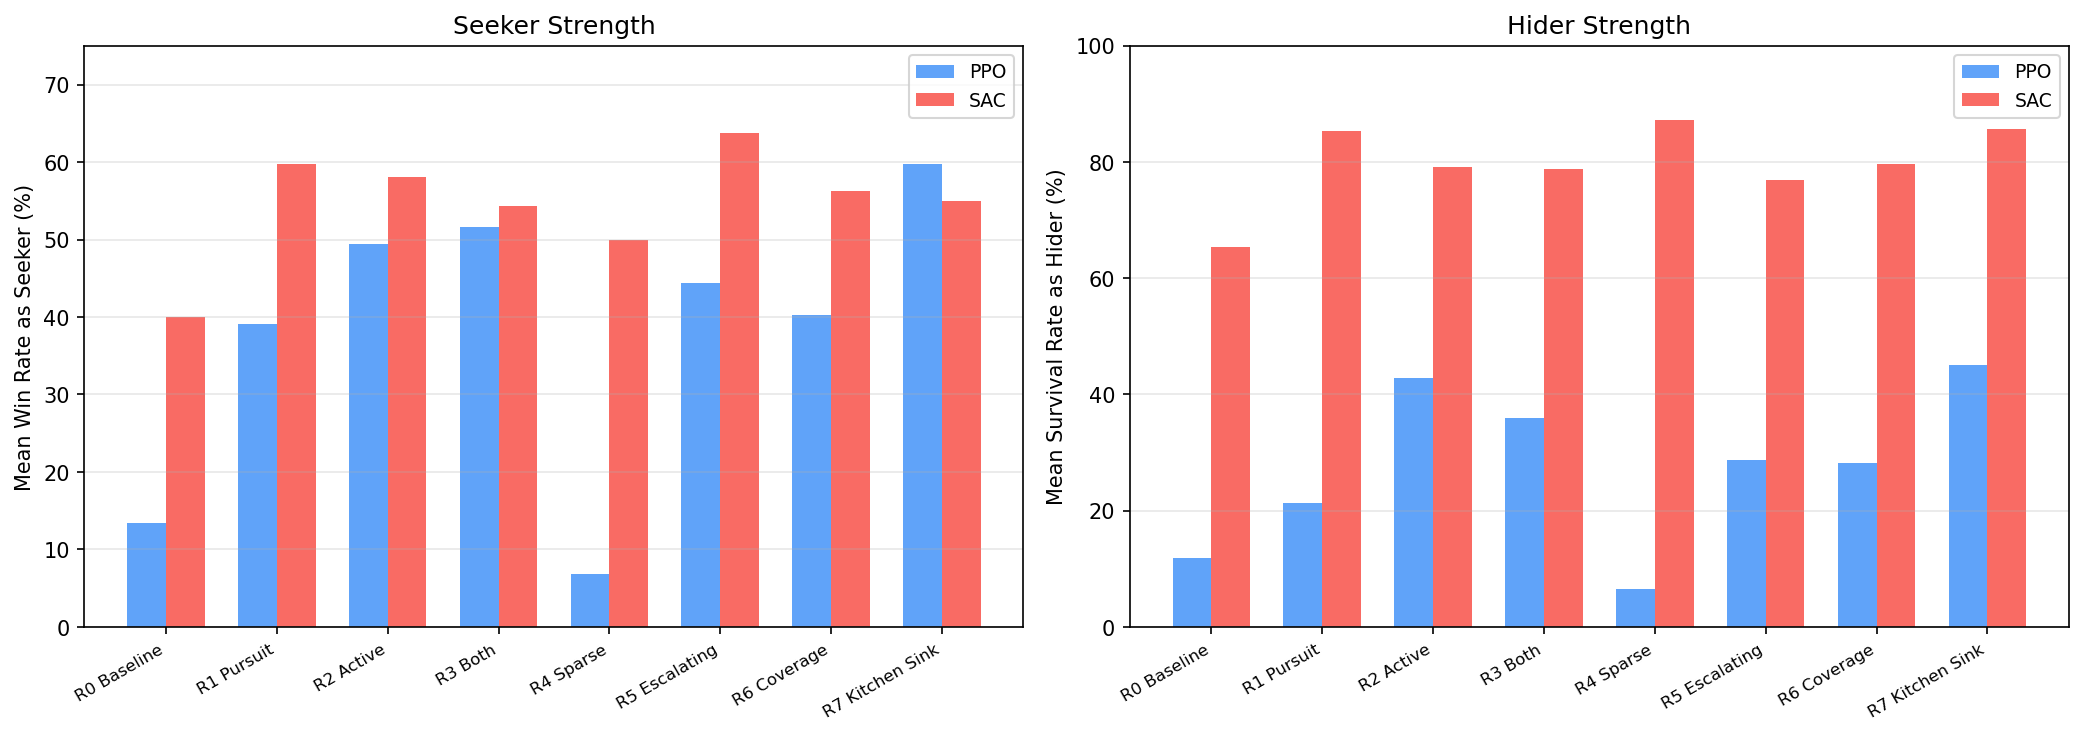
Findings:
- SAC dominates hider performance — every SAC hider achieves 65–87% survival rate vs 7–45% for PPO hiders. SAC’s entropy maximization naturally encourages diverse, hard-to-predict evasion.
- Shaped PPO seekers match SAC — R7 Kitchen Sink PPO (60% win rate) rivals the best SAC seekers. Dense reward shaping compensates for PPO’s lack of entropy bonus.
- Sparse rewards fail for PPO — R4 Sparse PPO produces the worst agents in both roles (7% each). But R4 Sparse SAC produces the best hider (87% survival) — SAC’s entropy bonus compensates for missing reward signal.
- More shaping isn’t always better — R7 Kitchen Sink doesn’t dominate. R5 Escalating SAC is the strongest seeker (64%), and it uses fewer reward terms than R7.
PPO vs SAC
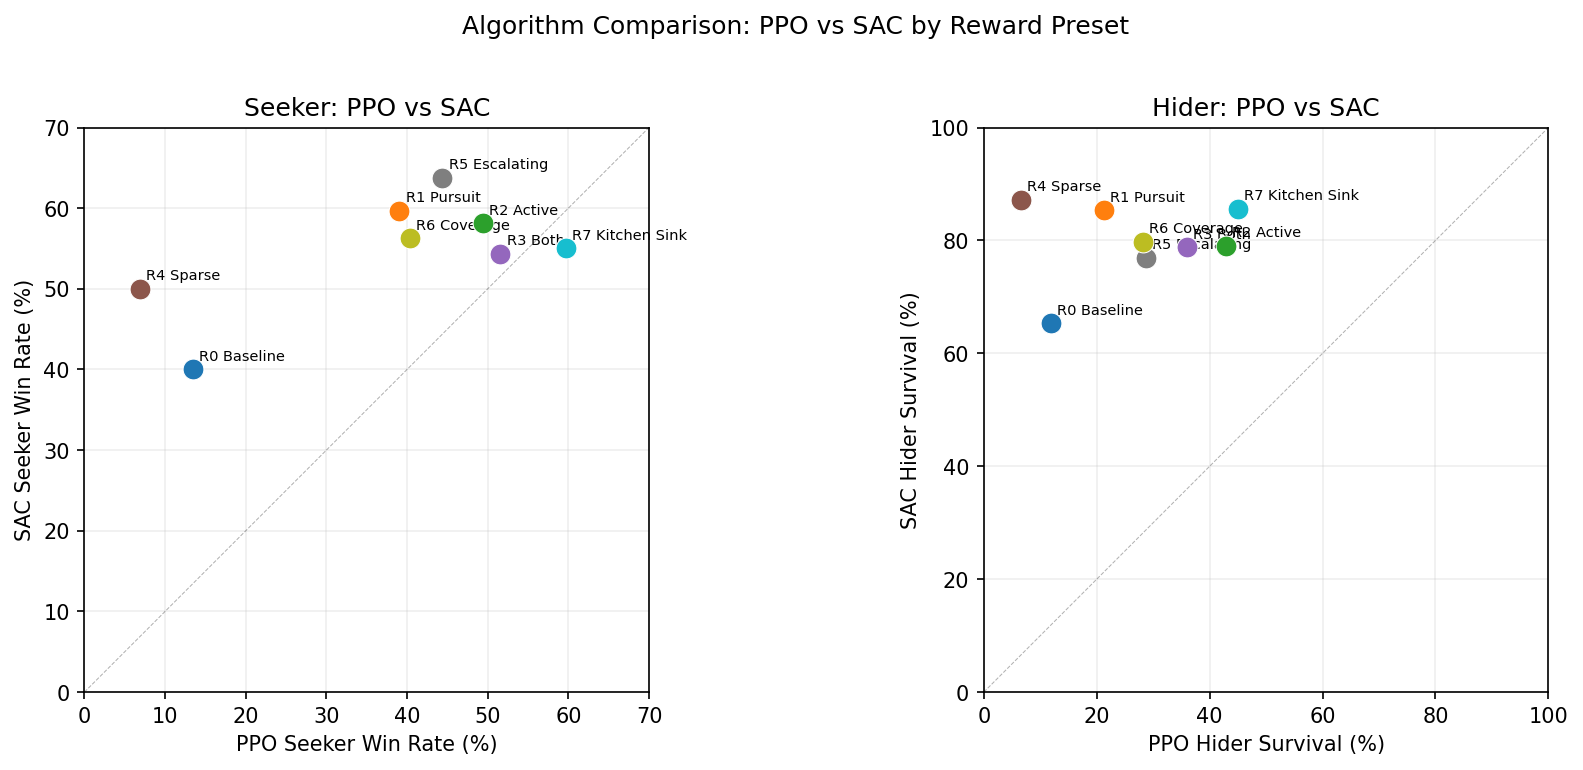
Points above the diagonal = SAC is stronger. Nearly all hider points sit above the line — SAC produces fundamentally better evaders.
The algorithm comparison reveals that the PPO vs SAC choice matters more for hiders than seekers. Pursuit is a relatively simple objective that PPO can solve with enough reward shaping. Evasion requires the kind of stochastic, unpredictable behavior that SAC’s entropy maximization provides naturally.
Learning Curves
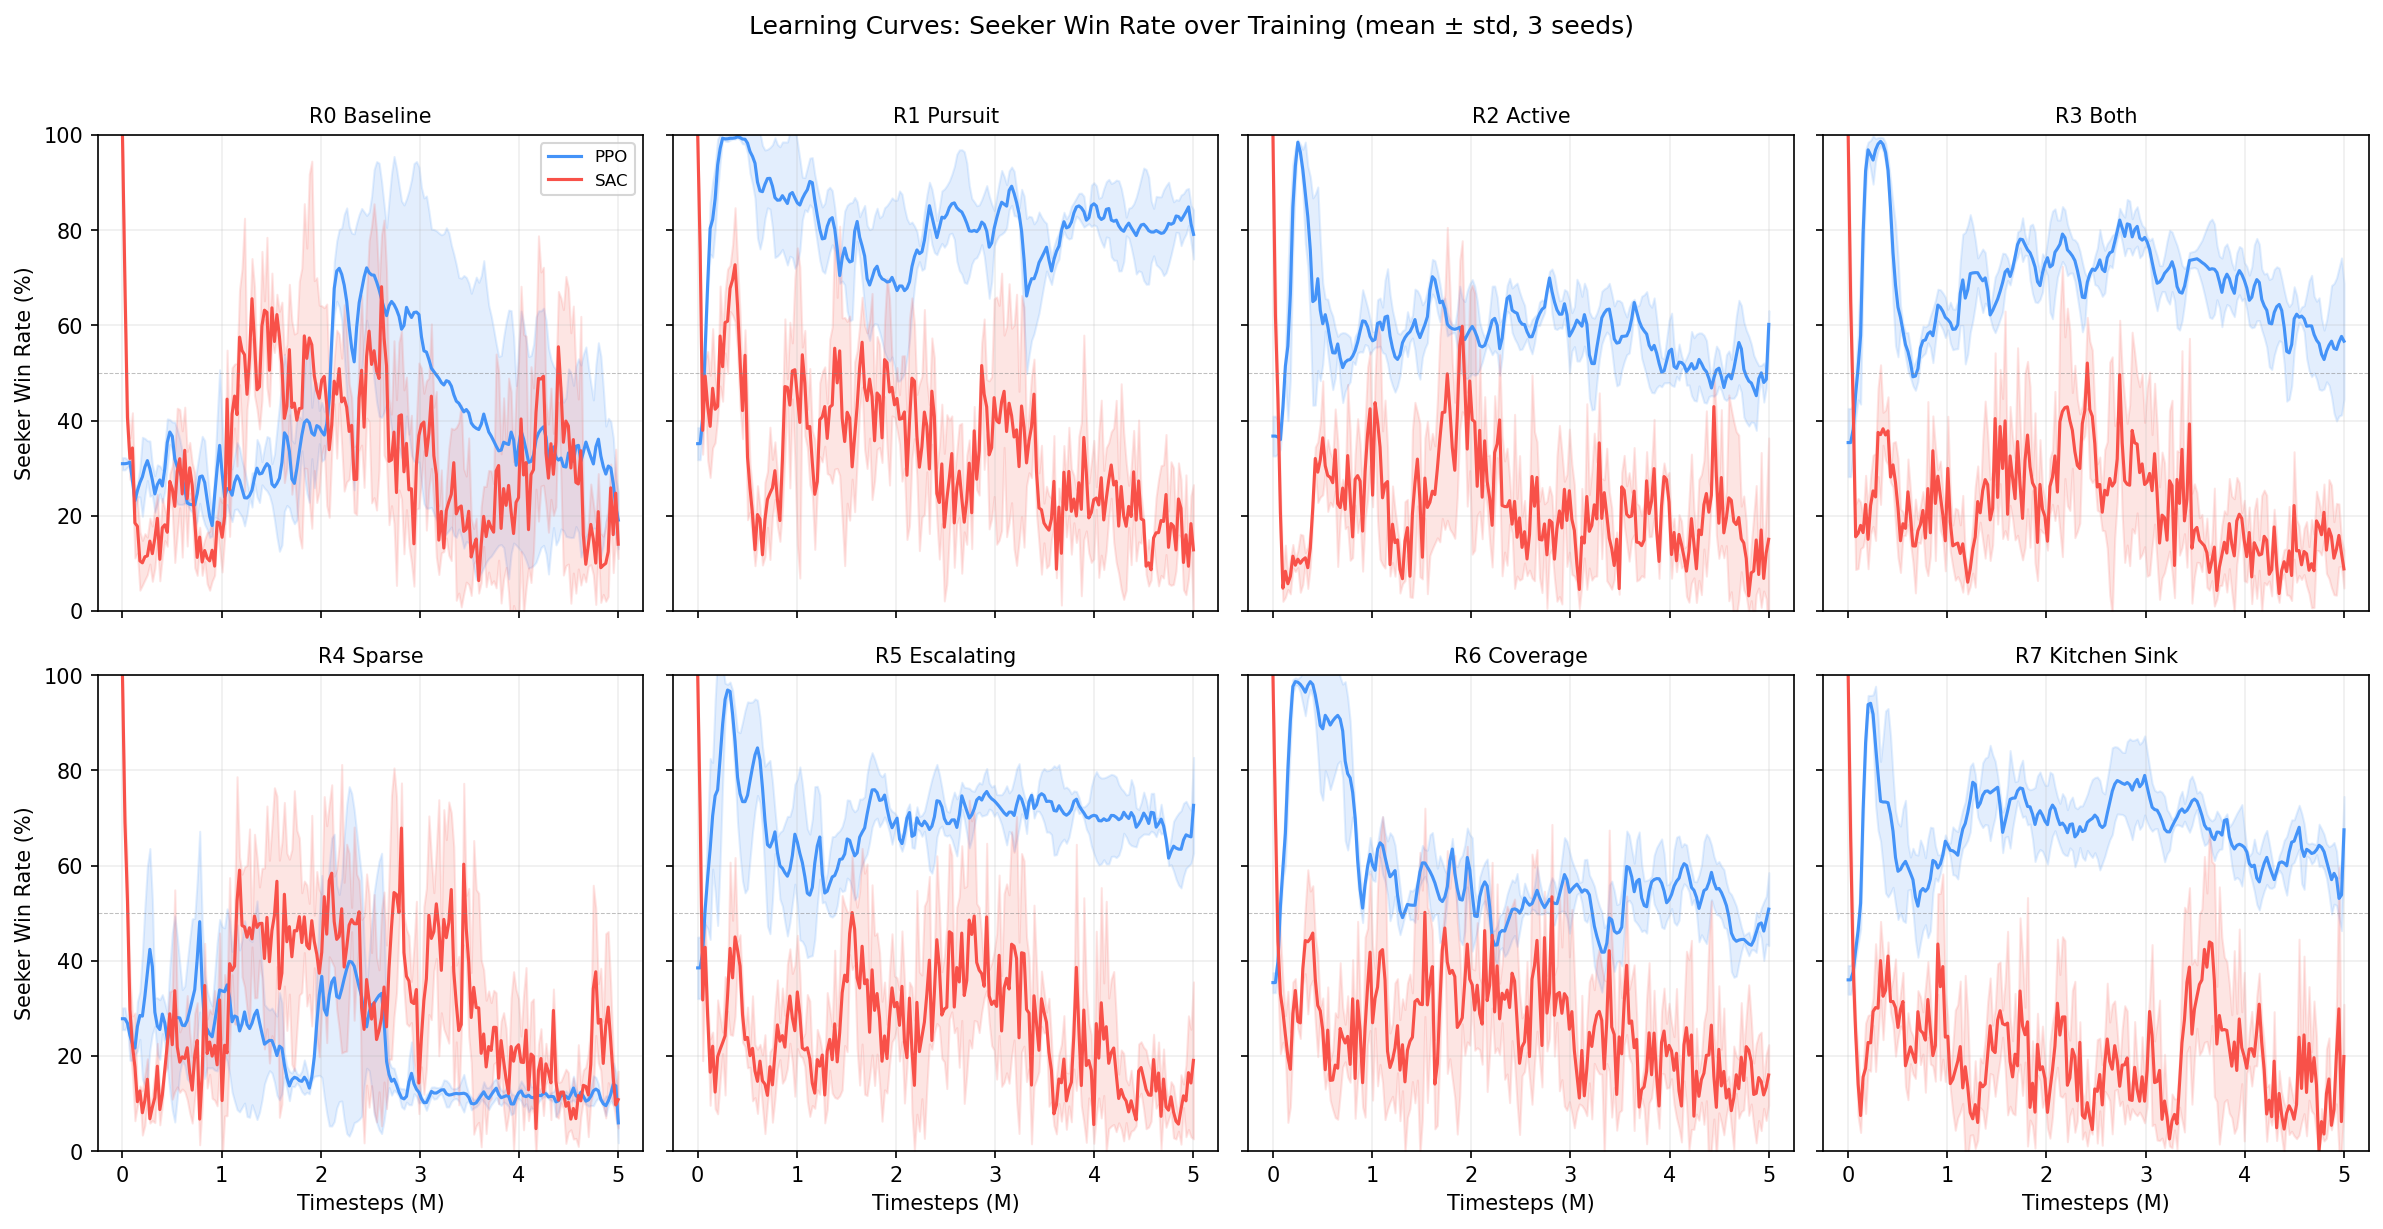
Seeker win rate over training (mean $\pm$ std across 3 seeds). 50% = balanced game.
Notable dynamics:
- R4 Sparse PPO never learns — win rate stays near 20% throughout training
- R1 Pursuit PPO spikes to 80%+ early then stabilizes — strong seeker shaping converges fast
- SAC curves are noisier but generally converge to more balanced equilibria (closer to 50%)
- R5 Escalating shows the most interesting dynamics — win rate oscillates as agents co-adapt
Reward Design Lessons
-
Anti-degenerate shaping matters more than reward magnitude. The wall proximity penalty $c_{\text{wall}}$ and speed bonus $c_{\text{speed}}$ (R2) prevent corner camping more effectively than increasing other reward terms.
-
Algorithm choice interacts with reward design. SAC with sparse rewards ($c = 0$ everywhere) outperforms PPO with dense rewards for evasion — the entropy bonus $\alpha \mathcal{H}[\pi]$ is a form of implicit reward shaping.
-
Escalating pressure creates drama. R5’s time-scaling $f(t) = 1 + t/T_{\max}$ produces the most dynamic episodes because the seeker’s behavior visibly shifts from cautious to aggressive as time runs out.
-
Kitchen sink is not optimal. R7 uses every shaping term but doesn’t produce the best agents. The reward terms can conflict — the coverage bonus $c_{\text{cov}}$ pulls agents away from each other, undermining pursuit/evasion signals from $c_{\text{dist}}$ and $c_{\Delta d}$.
Cross-Method Gauntlet
The within-preset gauntlet above answers which reward function is best? — but a bigger question remained: which training method produces the strongest opponents? We ran experiments across six different training paradigms, each producing agents via different mechanisms:
| Method | Training paradigm | Algorithm | Runs |
|---|---|---|---|
| Selfplay | Rolling opponent updates | PPO | 20 configs |
| Reward shaping | Self-play + reward presets | PPO, SAC | 8 presets $\times$ 2 algos |
| Zoo | Opponent sampling from checkpoint zoo | PPO | 280 configs |
| Zoo + hider shaping | Zoo with shaped hider rewards | PPO | 200 configs |
| FR sweep | Zoo + reward presets + A-mixing | PPO, SAC | 50 configs |
| FR sweep v2 | Optuna-optimized hyperparameters | PPO, SAC | 50 configs |
From 616 total trained agents across 9 method-algorithm combinations, we selected the top 3 representatives per method (most balanced, best seeker, best hider) and ran a full $27 \times 27 = 729$ matchup gauntlet at 50 episodes each.
Method Head-to-Head
The 9 method-algorithm combinations are aggregated into a single heatmap. Each cell averages across all seeker-hider pairs between two methods (3 seekers $\times$ 3 hiders = 9 matchups per cell, 50 episodes each):
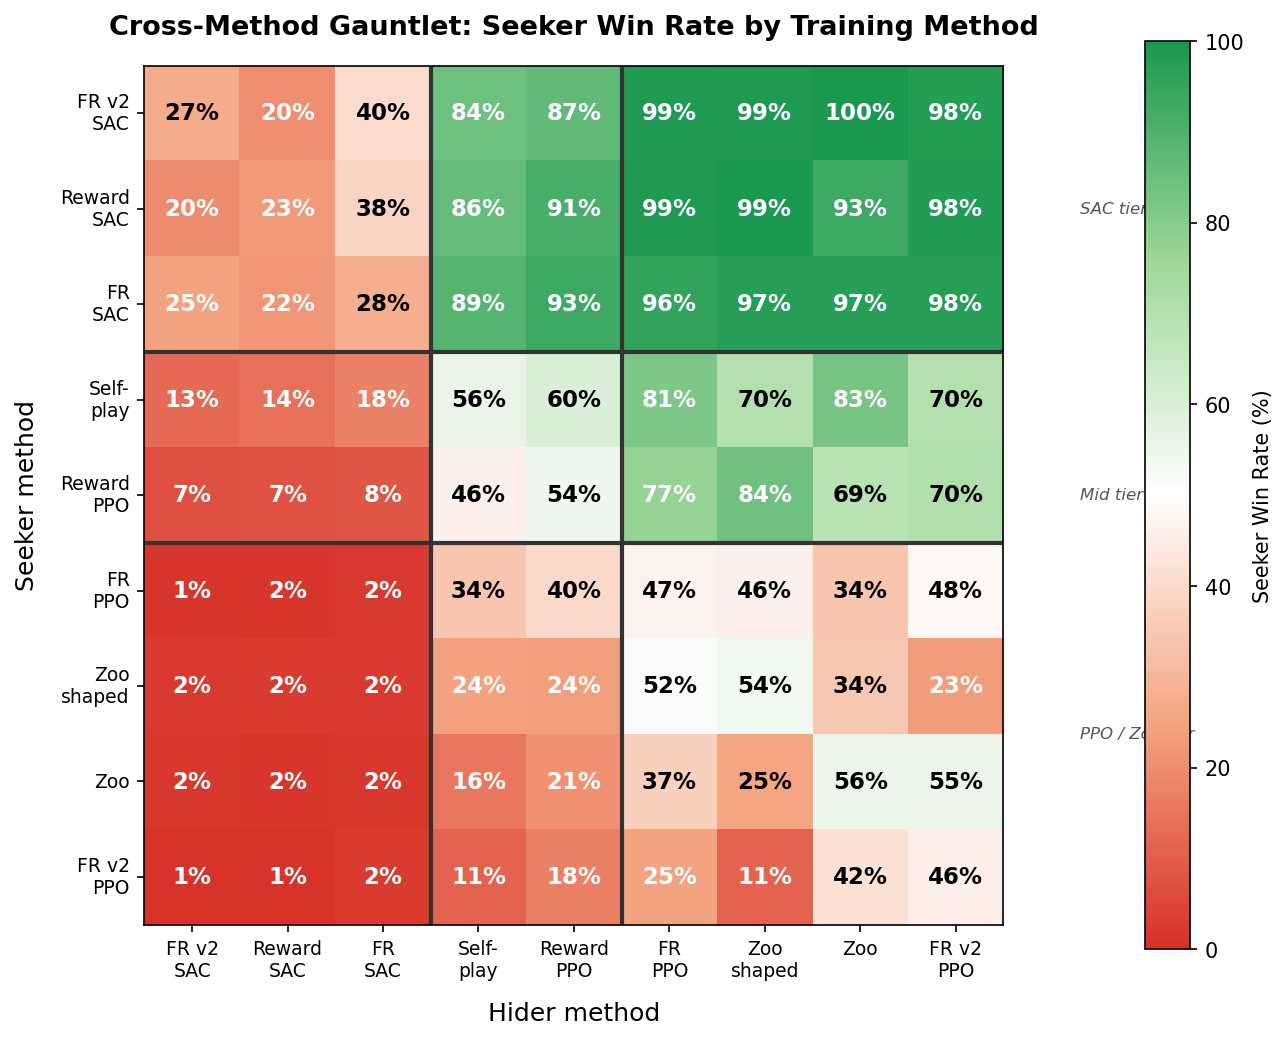
Seeker win rate (%) aggregated by training method. Rows = seeker’s method, columns = hider’s method. Black lines separate the three performance tiers. Green = seeker dominates, red = hider survives.
The heatmap reveals a stark three-tier structure:
- SAC tier (top-left 3$\times$3 block): SAC methods only struggle against each other, with win rates of 25–40%. Against everything else, they achieve 84–100%.
- Mid tier (selfplay, reward/PPO): Competitive against PPO/zoo methods but helpless against SAC hiders (7–18% WR).
- PPO/Zoo tier (bottom-right): Zoo and FR/PPO agents rarely win against anyone outside their own tier.
Agent Strength
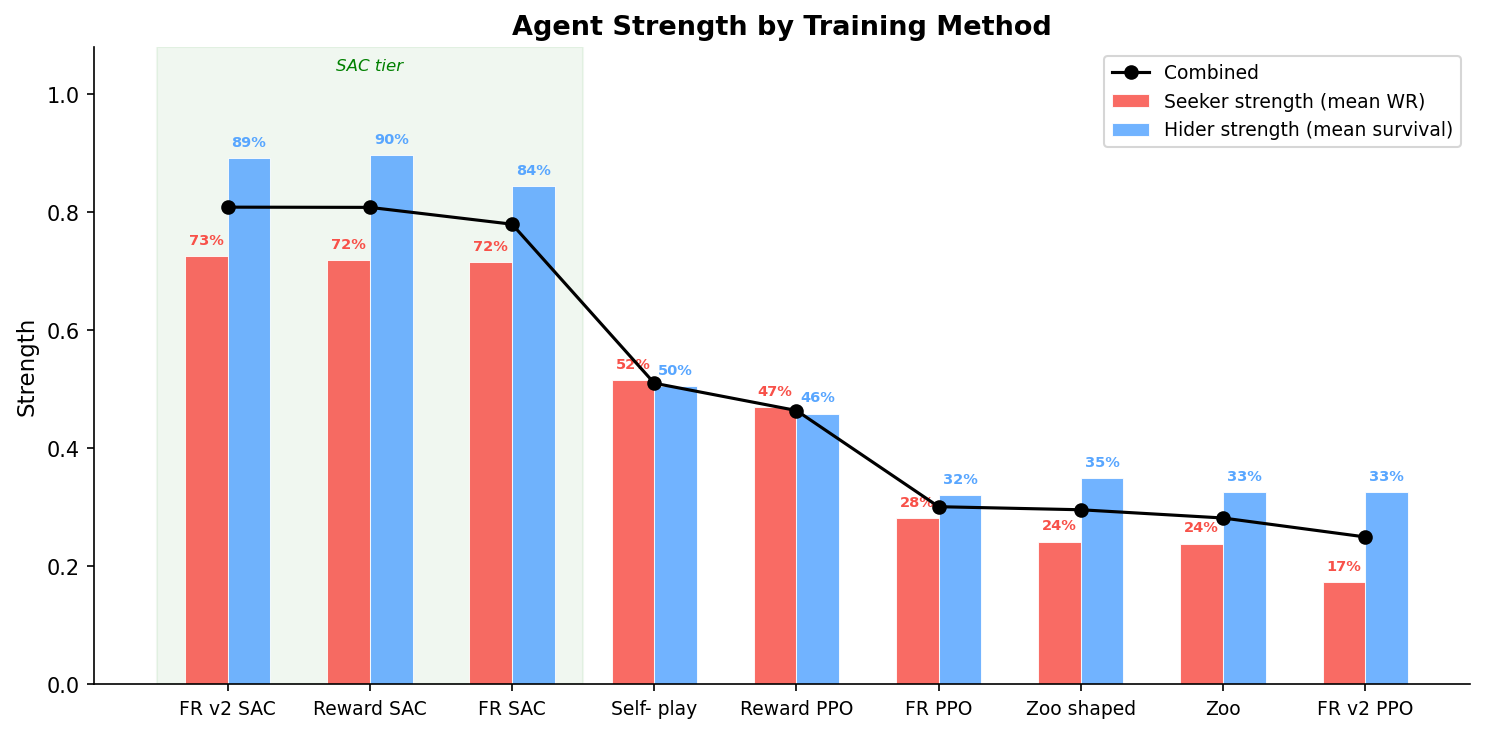
Seeker strength = mean win rate as seeker across all 27 hiders. Hider strength = mean survival rate across all 27 seekers. Combined = average of both.
| Method | Seeker | Hider | Combined |
|---|---|---|---|
| FR v2 / SAC | 72.6% | 89.1% | 80.9% |
| Reward / SAC | 71.9% | 89.7% | 80.8% |
| FR / SAC | 71.6% | 84.4% | 78.0% |
| Selfplay | 51.6% | 50.5% | 51.0% |
| Reward / PPO | 47.0% | 45.9% | 46.4% |
| FR / PPO | 28.2% | 32.0% | 30.1% |
| Zoo shaped | 24.2% | 35.0% | 29.6% |
| Zoo | 23.9% | 32.5% | 28.2% |
| FR v2 / PPO | 17.4% | 32.6% | 25.0% |
Full Agent-Level Heatmap
Drilling down from the 9$\times$9 method summary into the individual agents — all 27 representatives grouped by method:
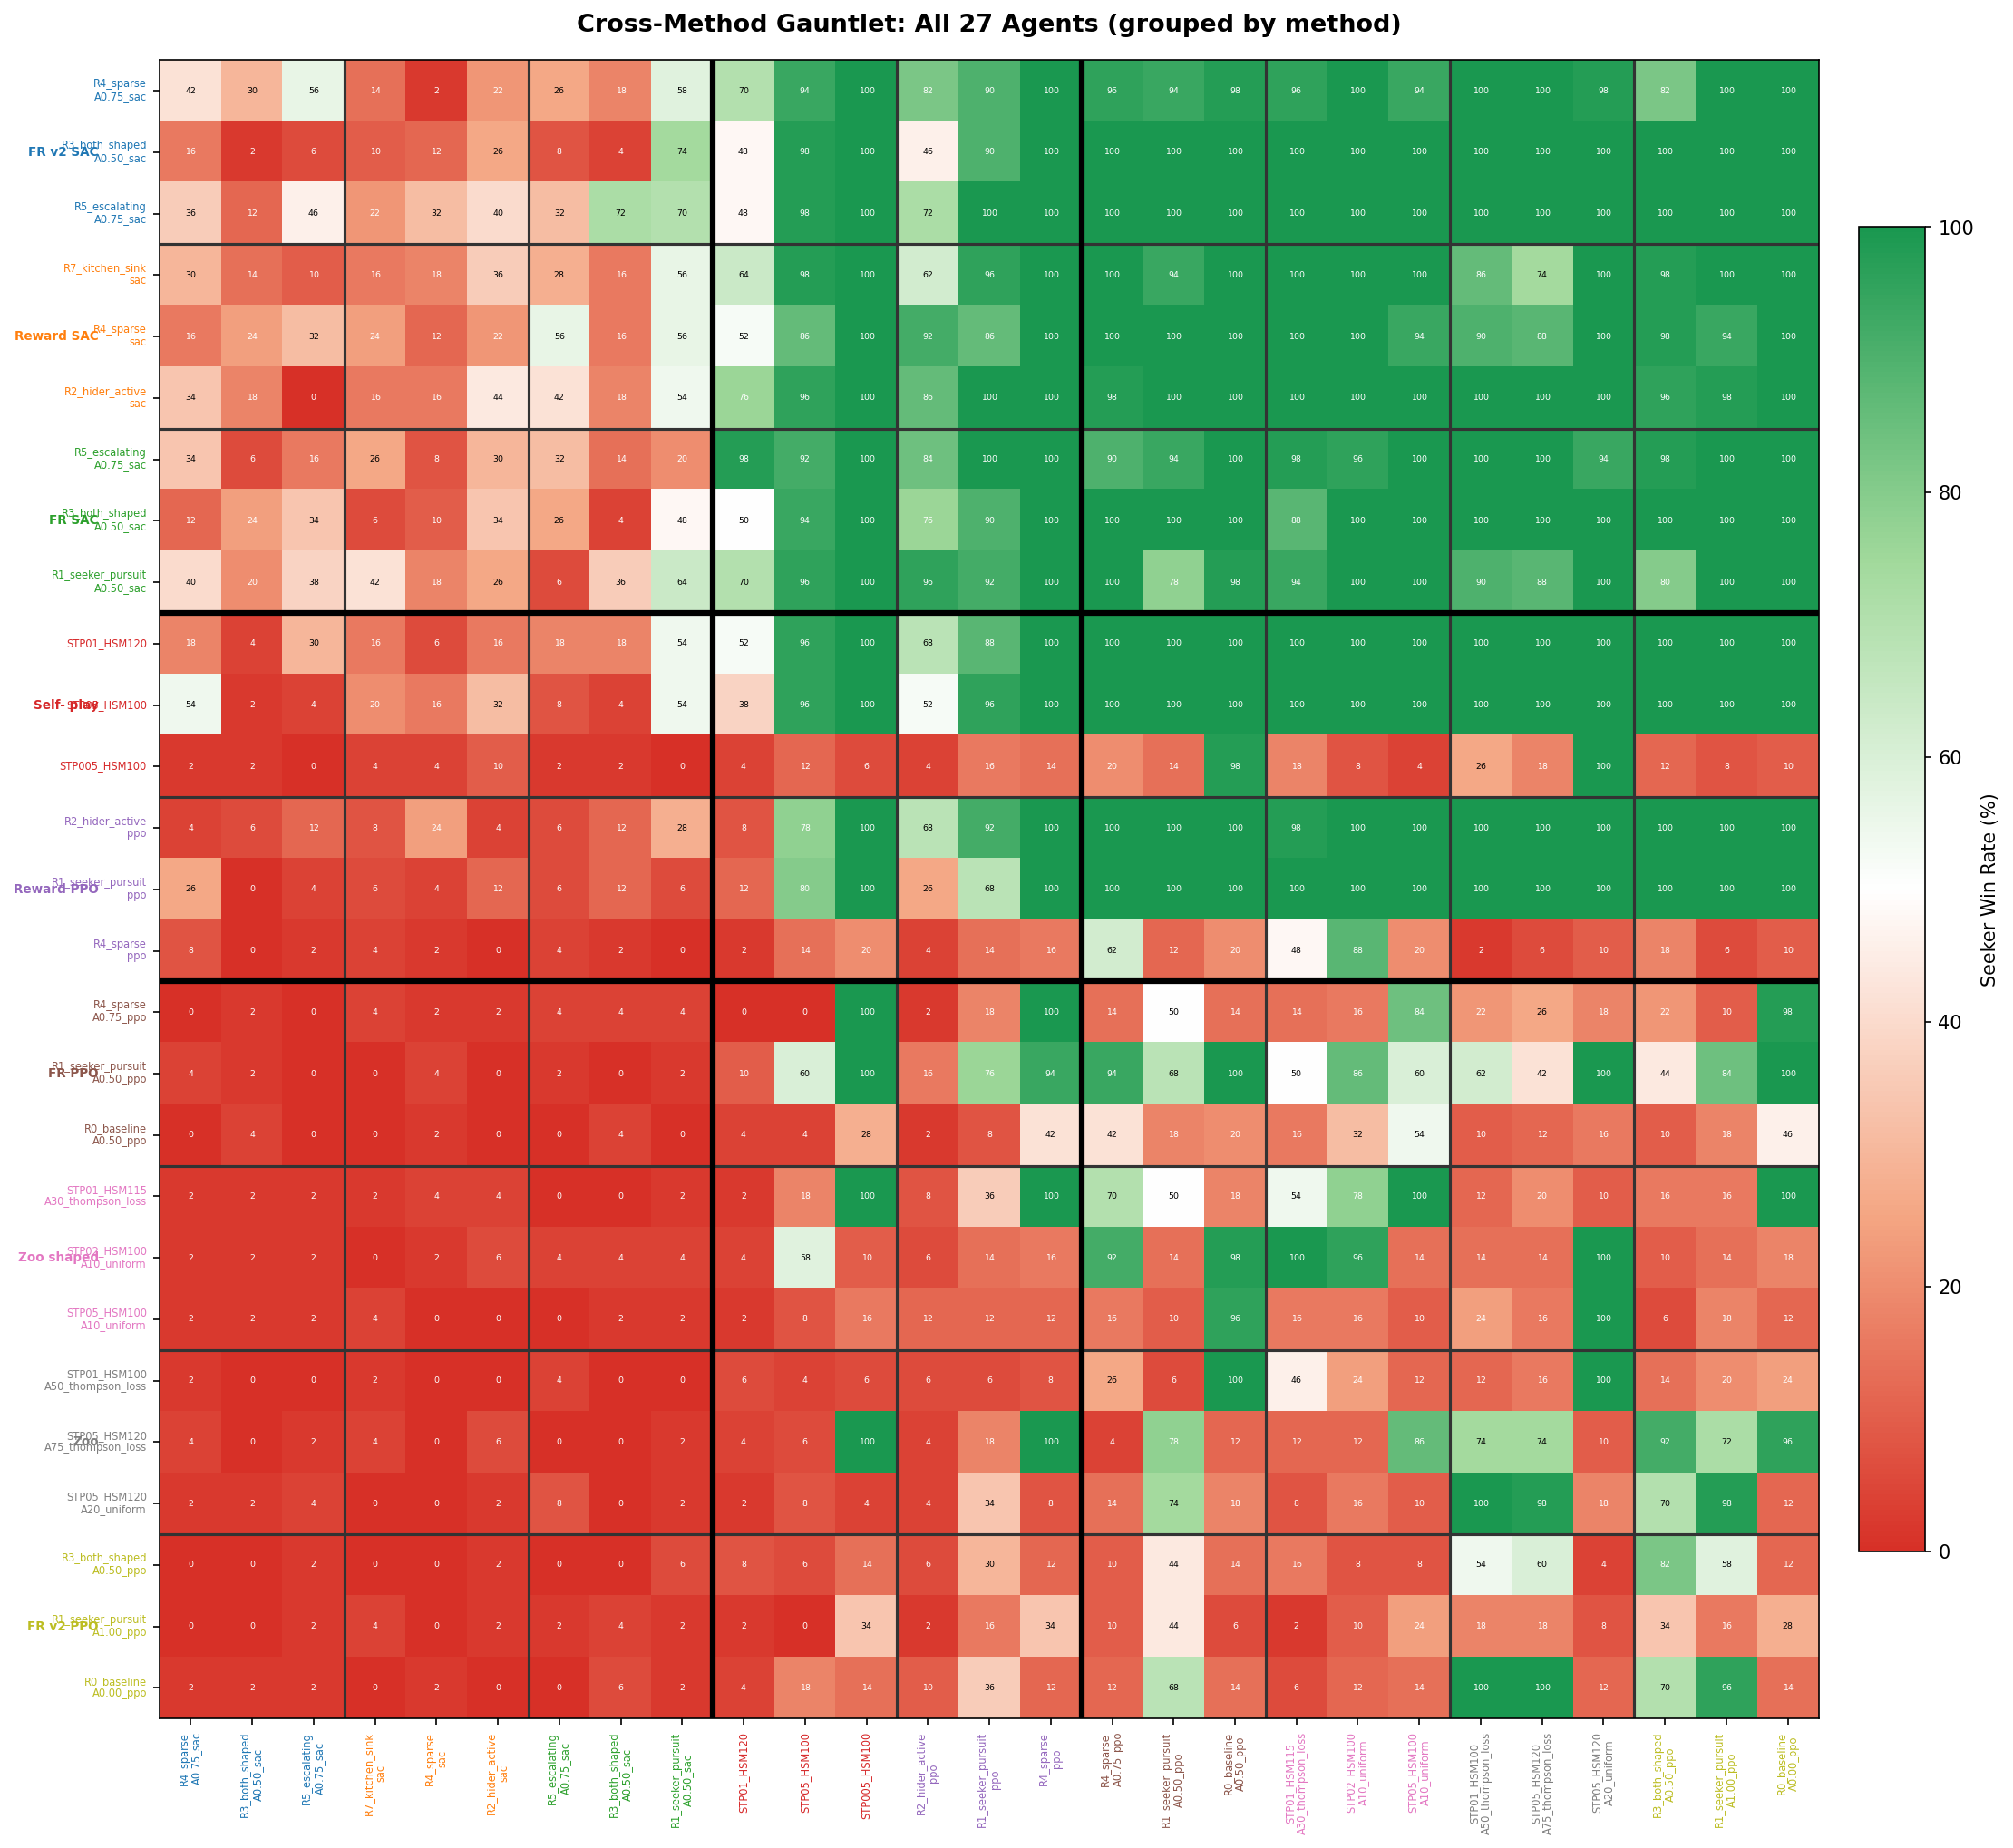
All $27 \times 27 = 729$ matchups. Agents grouped by method (thin lines) and tier (thick lines). Tick labels colour-coded by method. Each cell = 50 episodes.
The block structure from the method heatmap holds at the individual agent level: every SAC agent beats every PPO/zoo agent. Within the SAC tier, performance varies by reward preset and training config — the R5 Escalating seeker and R3 Both-Shaped hider consistently stand out.
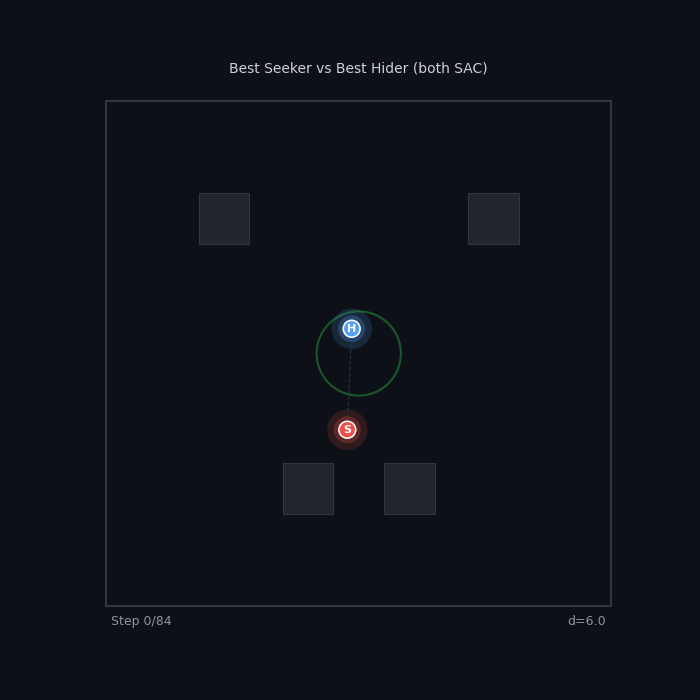
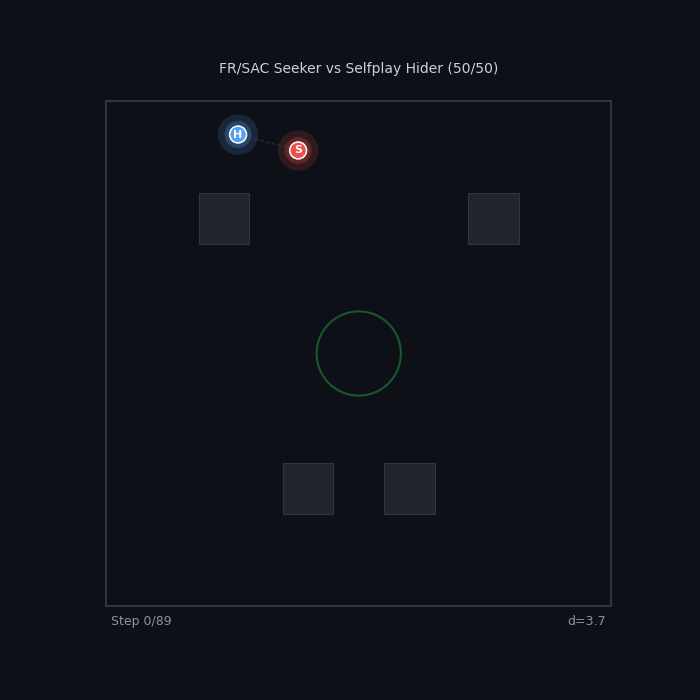
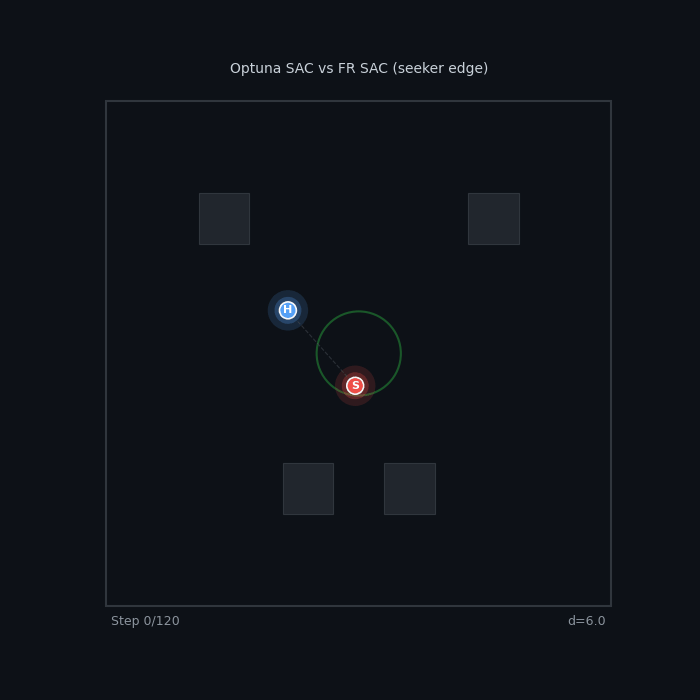
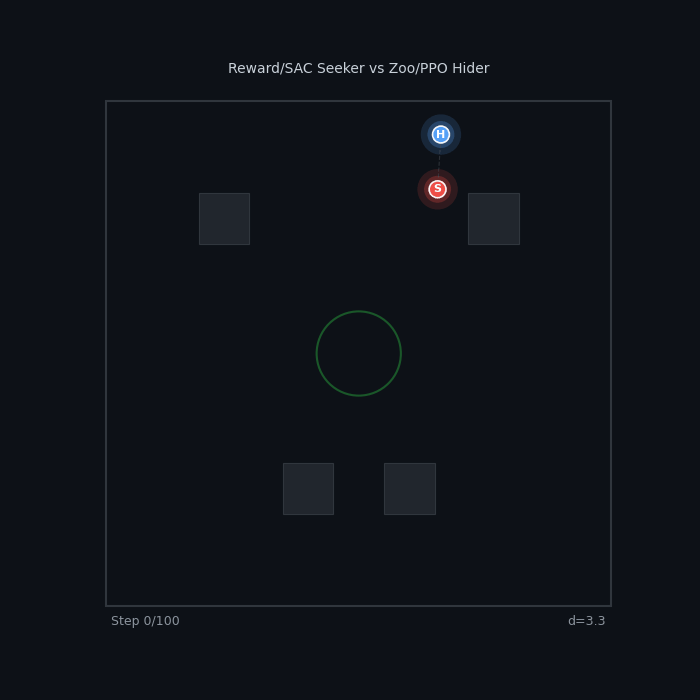
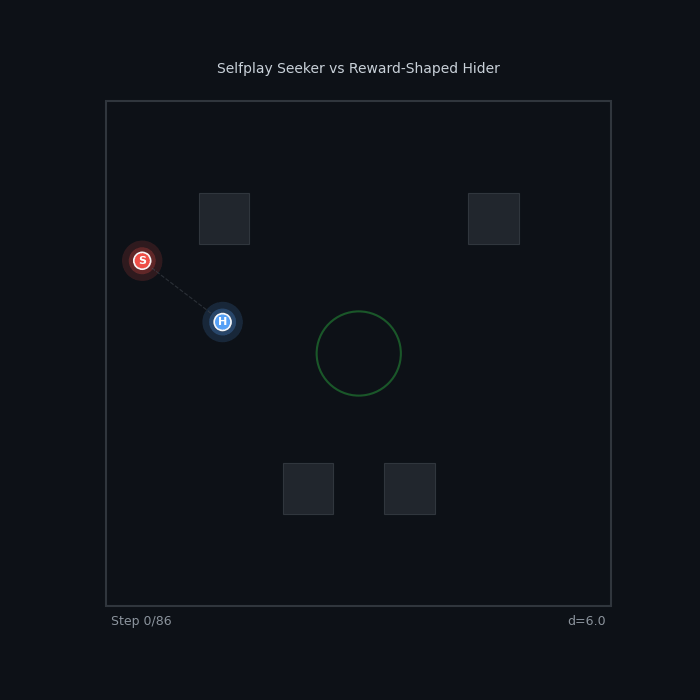
Showcase: Cross-Method Matchups
| Best Seeker vs Best Hider FR v2 Escalating SAC vs FR v2 Both-Shaped SAC 12% seeker WR — the hider is nearly uncatchable |
Perfect Rivals FR/SAC Seeker vs Selfplay Hider 50/50 — knife-edge balance across methods |
 |
 |
| SAC Mirror Match Optuna SAC Seeker vs FR SAC Hider 70% WR — escalating pressure overcomes evasion |
Tier Gap: SAC vs Zoo Reward/SAC Seeker vs Zoo/PPO Hider ~98% WR — the zoo hider has no answer |
 |
 |
| Selfplay vs Reward-Shaped Selfplay Seeker vs R2 Active Hider (PPO) ~52% — pure self-play competes with shaped rewards |
|
 |
|
Key Findings
-
SAC is the dominant factor. Whether agents trained via self-play, zoo sampling, or reward-preset sweeps, SAC consistently produced stronger agents than PPO. The entropy bonus $\alpha \mathcal{H}[\pi]$ acts as a universal “reward shaping” that cannot be replicated by hand-crafted reward terms.
-
Zoo training underperforms. Despite training against diverse opponents (checkpoint zoo with A-parameter mixing), zoo-trained PPO agents placed last. Opponent diversity during training did not translate to stronger final policies — the algorithm ceiling mattered more.
-
Optuna tuning helps marginally. FR v2 (Optuna-optimized hyperparameters) edged out the hand-tuned FR sweep for SAC (80.9% vs 78.0%), but the gap is small compared to the PPO/SAC divide.
-
Selfplay PPO is the best PPO method. Plain self-play without reward shaping or zoo mechanics achieved 51% combined — the highest among PPO methods. This suggests that for PPO, simpler training setups avoid overfitting to specific reward incentives.
-
The toughest opponents are both SAC. The hardest seeker to evade: FR v2 R5 Escalating SAC (77% WR). The hardest hider to catch: FR v2 R3 Both-Shaped SAC (93% survival). Both emerged from Optuna-tuned zoo training with reward presets.
616 agents across 6 training methods, 9 method-algorithm combinations. Top-3 per method selected by training balance, yielding $27 \times 27 = 729$ cross-evaluation matchups at 50 episodes each. Built with custom vectorized NumPy environment and PyTorch PPO/SAC.
What makes SAC dominant? The entropy temperature ablation investigates the mechanism. Surprisingly, SAC’s entropy bonus decays to near-zero within the first 10% of training — the advantage comes from a brief exploration phase, not sustained entropy. Fixed entropy is catastrophically worse than no entropy at all.
| Study series: Reward Shaping (this page) | HPO & Zoo Mixing | Entropy Ablation |